Wednesday, November 16, 2011

"Dancing Santa" - Christmas Tag

Here's a tag (well actually 19 tags) I made for an online Cricut Circle Canadian Members Christmas tag swap (which was open to US residents as well):
 
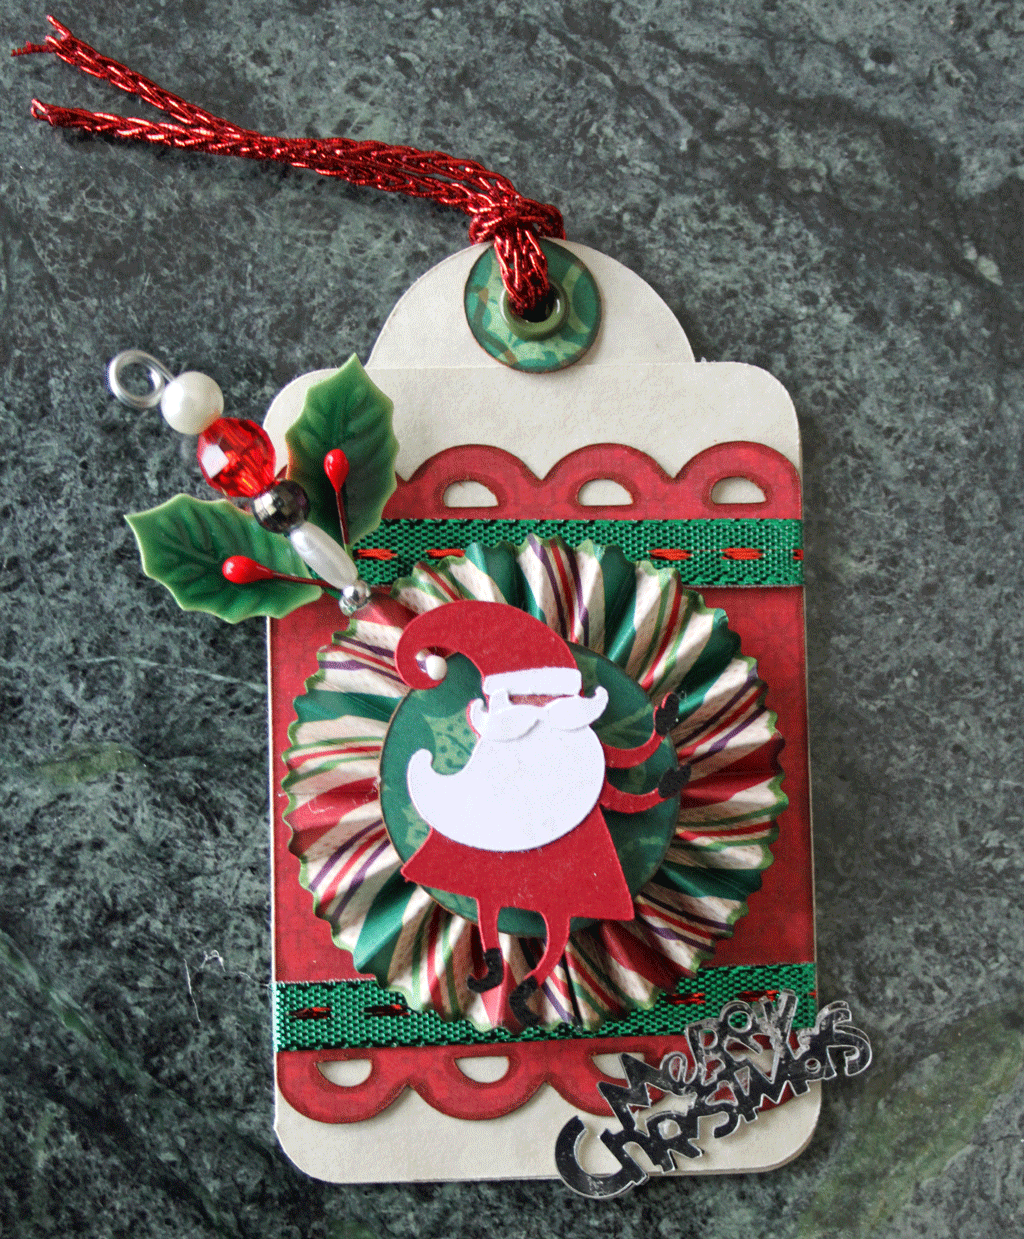
 I decided to use a Santa cut from the Christmas Cheer Cartridge as the focal point for the tag, because he looks like he's dancing to me and that appealed to me. 
 
There weren’t many criteria beyond a size requirement (retagular: maximum 3"x5", minimum 2"x3" or round: 4"x4" maximum or oval: 4" maximum any direction) – simply to decorate a tag any way we’d like with a Christmas or winter theme and to try to use at least 3 embellishments. 

My tag is four inches tall and opens like a card.  The inside is stamped with "to" and "from".

To make the stick pin, I used wire, cut to about 3 inches  and wrapped it twice around a knitting needle to make the loop at the top.   The wire was in the hardware section of the Dollar Store and I got a 150 foot (45 metre) roll for $1.25, so a super cheap way to make stick pins.   I then added my beads and a drop of glue to the last bead to hold all the beads in place. I trimmed the excess from the  "pin" to fit after the glue was dry.

I made the fan fold rosettes using my Martha Stewart Scoring Board. I started with a 1inch by 12 inch strip of paper cut on one of the long side with the Your Story Trimmer wave blade, fan folded it, glued the ends together to make a circle, stood the circle up and then pushed the top edge down toward the centre, so that the wavy side was on the outer edge of the rosette. This was glued onto a .75 inch circle to keep the rosette together.


Looking at the finished tag, I really should have inked the Santa like I did the rosette.   Oh well, too late now. I did pop up the Santa with foam mounts.


The sentiment is table confetti.  (I glued several pieces together to give it some more definition).

Supplies Used:
Cricut Expression
Cricut CMTH Art Philosophy Cartridge (tag)

Cricut Accent Essentials Cartridge (circles)
Cricut Christmas Cheer Cartridge (Santa)
Martha Stewart Scoring Pad
Dritz Green 2-part Eyelets

CMTH Celebration My Acrylix stamp (“to” & “from”) and green ink
Ribbon from Michaels and Dollar Store
White Inkssentials Enamel Accents (pompom on Santa’s hat)
Dollar Store Duramax 20 Gauge Galvanized Steel Wire
Beads from a Dollar Store Bracelet
Knitting needle (size 4mm)
Fibre Craft Lacquered Holly Leaf
Table Confetti (“Merry Christmas”)
Your Story Paper Trimmer
Patterned Paper: DCWV The Christmas Combo Stack
Solid Cardstock from my stash
Black Faux Leather Con-Tact Paper (Santa’s mitts and boots)
Self-adhesive foam mounts
Copic Markers (inking the Cricut cuts)
Hot glue and glue stick.

Thanks for looking and I hope you like my tag.

Linked on OMC.


Tuesday, November 15, 2011

Simple Birthday Card & My Neglected Husband

Do you know the saying "the shoe maker’s son has no shoes”? It refers to the cobbler spending so much time repairing the shoes of his customers that he doesn’t have the time to repair his children's shoes.  Well, that's how my husband feels about my card making these days.  I've been busy making gift tags for a swap (come back tomorrow to see the tag), so I threw together the following simple card for his birthday from scraps in my stash and using the Cuttlebug A2 Happy Birthday folder:


He made it known that while he thought the card was cute, he was a little disappointed he didn't get a more elaborate one.  I'll have to make it up to him on the next card I make for him.

Tuesday, November 1, 2011

Snowman Christmas Card

Here's a card I made to a online Cricut Circle Canadian Members Christmas card swap (which was open to non-Canadians as well):


The size of the card  was to be 4.25 x 5.5" and we had 17 participants, so we each had to make 17 of our cards for the swap.  I centred my card around this pretty filigree snowman stamp and embossed aluminum foil.

Supplies Used:
Cricut Expression
Cricut Ashlyn's Alphabet Cartridge (frame cut centre contour hidden with Design Studio)
Cuttlebug Embossing Folder from the Winter Wonderland embossing folders set
Inkadinkadoo Clear Stamp
Embossing Pad and Stampendous Embossing Powder
Ribbon from my stash
Studio G chalk ink (to outline on the Cricut cuts)

Self-adhesive foam mounts
Self-adhesive rhinestones from the Dollar Store
Aluminum foil (folded so it is two layers thick)
Cardstock from my stash

Thanks for looking.