Showing posts with label Christmas. Show all posts

Sunday, September 13, 2015

Another Chalkboard Christmas Tag

Here's a second tag I made:


I adore this snowman cut from Cricut Christmas Kitsch cartridge. 

Saturday, September 5, 2015

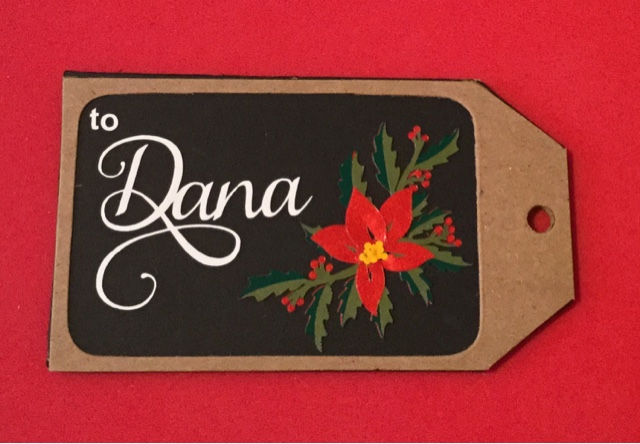
Chalkboard Christmas Tag

Found these great chalkboard tags at Dollarama and decided to make a Christmas tag using vinyl:


I'm really loving the Cricut 3D Floral Home Decor cartridge and seem to be using it a lot lately. 

Thanks for visiting. 

Saturday, October 12, 2013

Purpel & Teal Christmas Card

I'm not sure anyone is still reading this blog as I haven't posted in forever, but I'm still here.

I promised to do host a challenge for the online Canadian Swarm on the Cricut Circle Message Board, so the challenge I came up with is:

Create one of the following using at least one Cricut cut:
(1) a project for Halloween without using green, purple, yellow or orange in the project; or
(2) a project of Thanksgiving without using orange, brown, red or golden yellow in the project; or
(3) a project for Christmas without using any green, red or pure white in the project. [Off whites like a beige can be used.]
Note: you may use a prohibited colour if the shade is not traditional (for example, lime green in a Christmas project or soft lilac in a Halloween project).

And here's my sample project - a Christmas card in purple and teal:


I punched a lot (sorry I didn't count) purple branches using a Martha Stewart branch punch which I layered over a tree cut from the Cricut Craftroom Basics cartridge to create the tree for the focal point of the card. I'm not sure how I feel about a purple Christmas tree (even though I love purple), but I'm hoping it might be loved by someone who is not a fan of traditional Christmas colors.

Supplies Used:
Cricut Expression & Cricut CraftRoom Application
Cricut Craftroom Basics Cartridge (tree)
Cricut Elegant Edges Cartridge (fancy label)
DCWV - the Saffron Stack patterned paper
Recollections solid paper
Gold paper scrap from my stash
Recollections card base (A2 size)
Art Minds Embellishment (tree topper)
Cuttlebug Holly Ribbons Embossing Folder
Dollar Store Rhinestones & sequins
Celebrate It Wired Edge Ribbon
Martha Stewart Branch Punch

Thanks for checking out my card.

Thursday, December 15, 2011

Dear Santa Shirt

This is a quick project I made that I intend to wear often this holiday season:


The tunic shirt is from Costco. The font is from Lyrical Letters Cartridge and I used Cricut Design Studio to flip the phrase and it's cut from Silhouette flocked heat transfer vinyl. I then ironed it onto the shirt.  Here's a close-up:


The poinsettia is a Dress It Up button I picked up from Michaels.

Easy peasy and the Silhouette flocked heat transfer vinyl cut wonderfully with my Expression.

Wednesday, December 7, 2011

Snowman Explosion Box - Gift Card Holder

This months Circle Magazine Challenge is to use the Circle exclusive cart Sophie for at least three cuts to create a holiday project.  I decided to make a Christmas gift card holder explosion box:


The large snowflake, the frame around "Merry Christmas" and the border on the front of the gift card pocket are all cuts from Sophie.  For the border, I welded several of the same snowflake cuts using Cricut CraftRoom and cut it out of scrap piece of sparkly silver vinyl.


The snowman in the centre is made with three pompom glued together. 


I used black half-beads for the eyes and a piece of a red rubber band for the mouth.  To make the "carrot" nose, I used  a piece of orange tissue paper with white glue rolled and shaped by hand.  The arms are toothpicks (with the point cut off), ends split into three and coloured brown.The top hat is back duct tape over black card stock cut freehand (to give it a more organic look) and glued together .


The stamped snowman image is the same one I used in a card I had posted in November. This time I embossed a cut portion of aluminium food tray which is sturdier than the aluminium foil I used with the card.


I intentionally made the outside of the box simple to contrast with the overkill of elements on the inside.

Supplies Used:
Cricut Expression & Cricut CraftRoom Application

Cricut Sophie Cartridge
Cricut Ashlyn's Alphabet Cartridge
Cuttlebug Embossing Folders from the Winter Wonderland embossing folders set
Inkadinkadoo Clear Stamp
Embossing Pad and Stampendous Embossing Powder
Ribbon from my stash
Studio G chalk ink and Copic Markers (to outline card stock)
Self-adhesive foam mounts
Self-adhesive rhinestones, confetti, plastic "mirror" snowflakes from the Dollar Store
Aluminium food tray
Solid and sparkle card stock are Recollections brand
Patterned card stock is Anna Griffin Georgette Christmas Collection
Martha Stewart Glitter
Orange Tissue Paper
White pompom - (three sizes), Cotton batting and Felt
Duct tape
Black half pearls
red rubber band
Toothpicks
Ribbon Flower from my stash
White pearls, black pearl, black pin and a thin piece of black plastic punch with a circle to make the snowman stick pin.

Thanks so much for looking. 

Tuesday, December 6, 2011

Bilingual "Merry Christmas" Charger Plates

I decorated a couple of charger plates that I picked up at Michael's with vinyl scraps that I got from a generous local sign shop.  The first is a [surprise, surprise] Croatian-English bilingual plate:


I used the Winter Woodland cartridge for the font, the Inspired Heart cartridge for the nativity scene and the Wrap-it-Up cartridge for the snowflakes.

The second is a French-English bilingual plate:


I used the Lyrical Letter's cartridge for the font and the tree, the star on the tree is from the Graphically Speaking cartridge (welded with Design Studio) and the Picturesque cartridge  was used for the scrolls.

I think the charger plates are a fantastic quick project that has a lot of punch for a small price.