Friday, December 30, 2011

Welcome 2012 Cupcakes

My dear hubby got me a Cricut Cake for Christmas and I used it to make the toppers on the following cupcakes for our New Years party:


I used a modeling chocolate (which is  a mixture of chocolate and corn syrup) for the toppers.   I searched the web and found the information on Hungry Happenings Blog very helpful to make the modeling chocolate using white candy melts.  The modeling chocolate is sticky enough so that you don't need to use shortening on the mat. Just roll it out directly on the mat and cut.  I let the cuts harden on a cooling rack for a couple of days prior placing them on the cupcakes.


The cuts for the numbers are from the Hello Kitty Font cartridge sized and welded together using  Cricut CraftRoom.  Here's a close up of one of the cupcakes:


Thanks for letting me share and wishing you all a Healthy and Happy New Year!

Thursday, December 15, 2011

Dear Santa Shirt

This is a quick project I made that I intend to wear often this holiday season:


The tunic shirt is from Costco. The font is from Lyrical Letters Cartridge and I used Cricut Design Studio to flip the phrase and it's cut from Silhouette flocked heat transfer vinyl. I then ironed it onto the shirt.  Here's a close-up:


The poinsettia is a Dress It Up button I picked up from Michaels.

Easy peasy and the Silhouette flocked heat transfer vinyl cut wonderfully with my Expression.

Wednesday, December 7, 2011

Snowman Explosion Box - Gift Card Holder

This months Circle Magazine Challenge is to use the Circle exclusive cart Sophie for at least three cuts to create a holiday project.  I decided to make a Christmas gift card holder explosion box:


The large snowflake, the frame around "Merry Christmas" and the border on the front of the gift card pocket are all cuts from Sophie.  For the border, I welded several of the same snowflake cuts using Cricut CraftRoom and cut it out of scrap piece of sparkly silver vinyl.


The snowman in the centre is made with three pompom glued together. 


I used black half-beads for the eyes and a piece of a red rubber band for the mouth.  To make the "carrot" nose, I used  a piece of orange tissue paper with white glue rolled and shaped by hand.  The arms are toothpicks (with the point cut off), ends split into three and coloured brown.The top hat is back duct tape over black card stock cut freehand (to give it a more organic look) and glued together .


The stamped snowman image is the same one I used in a card I had posted in November. This time I embossed a cut portion of aluminium food tray which is sturdier than the aluminium foil I used with the card.


I intentionally made the outside of the box simple to contrast with the overkill of elements on the inside.

Supplies Used:
Cricut Expression & Cricut CraftRoom Application

Cricut Sophie Cartridge
Cricut Ashlyn's Alphabet Cartridge
Cuttlebug Embossing Folders from the Winter Wonderland embossing folders set
Inkadinkadoo Clear Stamp
Embossing Pad and Stampendous Embossing Powder
Ribbon from my stash
Studio G chalk ink and Copic Markers (to outline card stock)
Self-adhesive foam mounts
Self-adhesive rhinestones, confetti, plastic "mirror" snowflakes from the Dollar Store
Aluminium food tray
Solid and sparkle card stock are Recollections brand
Patterned card stock is Anna Griffin Georgette Christmas Collection
Martha Stewart Glitter
Orange Tissue Paper
White pompom - (three sizes), Cotton batting and Felt
Duct tape
Black half pearls
red rubber band
Toothpicks
Ribbon Flower from my stash
White pearls, black pearl, black pin and a thin piece of black plastic punch with a circle to make the snowman stick pin.

Thanks so much for looking. 

Tuesday, December 6, 2011

Bilingual "Merry Christmas" Charger Plates

I decorated a couple of charger plates that I picked up at Michael's with vinyl scraps that I got from a generous local sign shop.  The first is a [surprise, surprise] Croatian-English bilingual plate:


I used the Winter Woodland cartridge for the font, the Inspired Heart cartridge for the nativity scene and the Wrap-it-Up cartridge for the snowflakes.

The second is a French-English bilingual plate:


I used the Lyrical Letter's cartridge for the font and the tree, the star on the tree is from the Graphically Speaking cartridge (welded with Design Studio) and the Picturesque cartridge  was used for the scrolls.

I think the charger plates are a fantastic quick project that has a lot of punch for a small price.

Butterfly Birthday Explosion Box

This week's Cricut Circle challenge is to shop your stash and incorporate purchased flowers into a project with at least 2 Cricut Image Cuts.  I decided make an explosion box gift card holder. 


The flower was bought ages ago from the Dollar Store and I used Copics to colour it to coordinate with the colours in the rest of the box. 


I used six cuts from Accent Essentials on the cake plus a scalloped circle (also from Accent Essentials) the under the "celebrate" metal tag.  The metal ribbon with beads is from Pier 1 (I got it on clearance after Christmas a couple of years back and this is my first time using it in a project). 


Sorry for the lack of a detailed supplies used list, but it is December and I'm a little swamped with the stuff that interferes with crafting.  I will be posting another explosion box later this week and I promise a supplies list will be provided for that one.

Wednesday, November 16, 2011

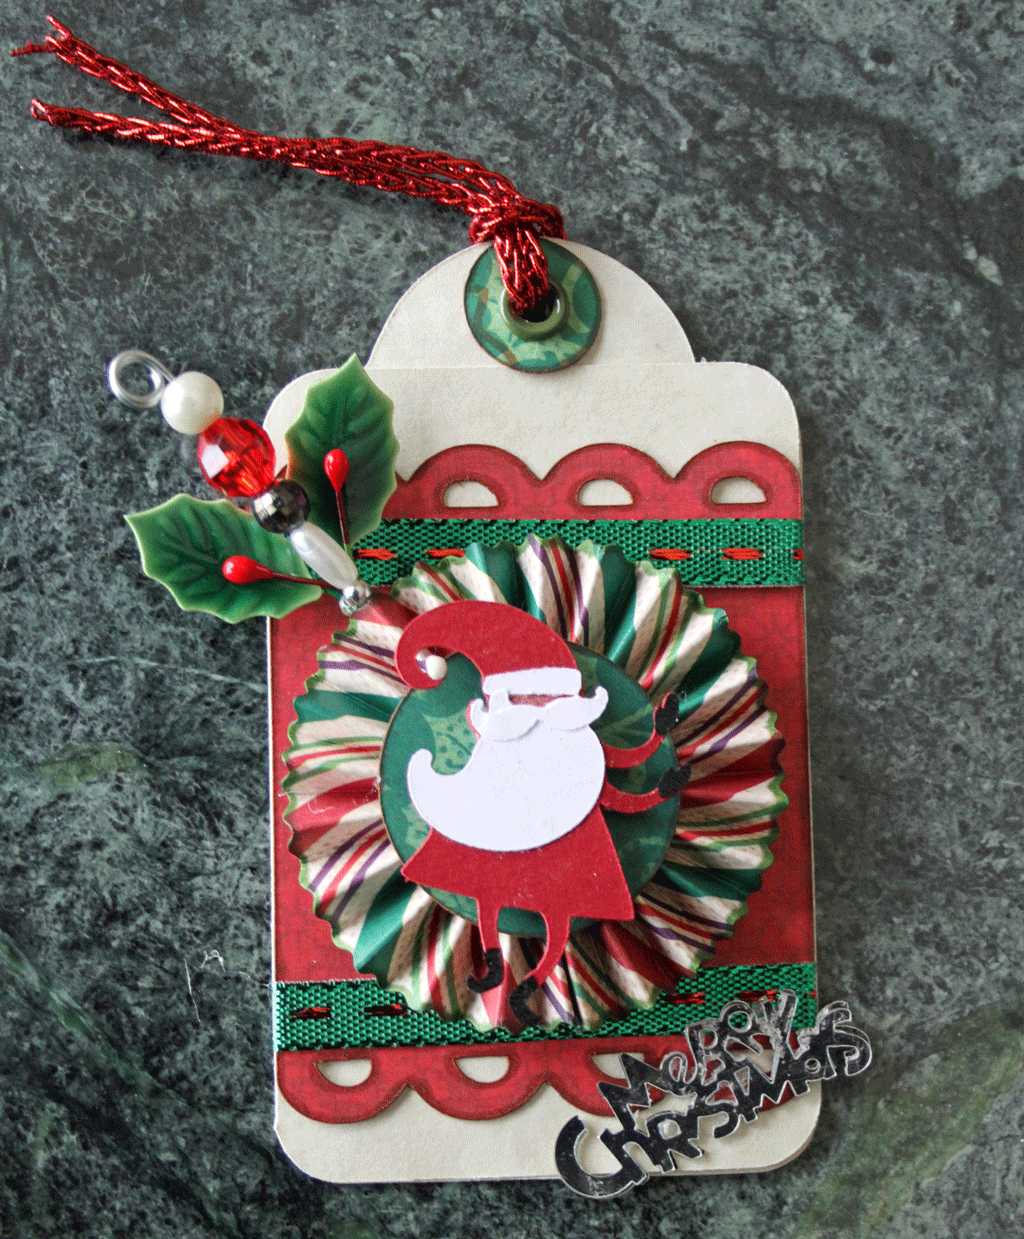
"Dancing Santa" - Christmas Tag

Here's a tag (well actually 19 tags) I made for an online Cricut Circle Canadian Members Christmas tag swap (which was open to US residents as well):
 
 I decided to use a Santa cut from the Christmas Cheer Cartridge as the focal point for the tag, because he looks like he's dancing to me and that appealed to me. 
 
There weren’t many criteria beyond a size requirement (retagular: maximum 3"x5", minimum 2"x3" or round: 4"x4" maximum or oval: 4" maximum any direction) – simply to decorate a tag any way we’d like with a Christmas or winter theme and to try to use at least 3 embellishments. 

My tag is four inches tall and opens like a card.  The inside is stamped with "to" and "from".

To make the stick pin, I used wire, cut to about 3 inches  and wrapped it twice around a knitting needle to make the loop at the top.   The wire was in the hardware section of the Dollar Store and I got a 150 foot (45 metre) roll for $1.25, so a super cheap way to make stick pins.   I then added my beads and a drop of glue to the last bead to hold all the beads in place. I trimmed the excess from the  "pin" to fit after the glue was dry.

I made the fan fold rosettes using my Martha Stewart Scoring Board. I started with a 1inch by 12 inch strip of paper cut on one of the long side with the Your Story Trimmer wave blade, fan folded it, glued the ends together to make a circle, stood the circle up and then pushed the top edge down toward the centre, so that the wavy side was on the outer edge of the rosette. This was glued onto a .75 inch circle to keep the rosette together.


Looking at the finished tag, I really should have inked the Santa like I did the rosette.   Oh well, too late now. I did pop up the Santa with foam mounts.


The sentiment is table confetti.  (I glued several pieces together to give it some more definition).

Supplies Used:
Cricut Expression
Cricut CMTH Art Philosophy Cartridge (tag)

Cricut Accent Essentials Cartridge (circles)
Cricut Christmas Cheer Cartridge (Santa)
Martha Stewart Scoring Pad
Dritz Green 2-part Eyelets

CMTH Celebration My Acrylix stamp (“to” & “from”) and green ink
Ribbon from Michaels and Dollar Store
White Inkssentials Enamel Accents (pompom on Santa’s hat)
Dollar Store Duramax 20 Gauge Galvanized Steel Wire
Beads from a Dollar Store Bracelet
Knitting needle (size 4mm)
Fibre Craft Lacquered Holly Leaf
Table Confetti (“Merry Christmas”)
Your Story Paper Trimmer
Patterned Paper: DCWV The Christmas Combo Stack
Solid Cardstock from my stash
Black Faux Leather Con-Tact Paper (Santa’s mitts and boots)
Self-adhesive foam mounts
Copic Markers (inking the Cricut cuts)
Hot glue and glue stick.

Thanks for looking and I hope you like my tag.

Linked on OMC.


Tuesday, November 15, 2011

Simple Birthday Card & My Neglected Husband

Do you know the saying "the shoe maker’s son has no shoes”? It refers to the cobbler spending so much time repairing the shoes of his customers that he doesn’t have the time to repair his children's shoes.  Well, that's how my husband feels about my card making these days.  I've been busy making gift tags for a swap (come back tomorrow to see the tag), so I threw together the following simple card for his birthday from scraps in my stash and using the Cuttlebug A2 Happy Birthday folder:


He made it known that while he thought the card was cute, he was a little disappointed he didn't get a more elaborate one.  I'll have to make it up to him on the next card I make for him.